
Best Control Panels to Buy in June 2026

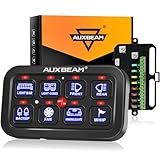
Auxbeam 6 Gang Switch Panel BC60, Universal Circuit Control Relay System Box with Automatic Dimmable On-Off LED Switch Pod Touch Switch Box for Car Pickup Truck UTV ATV Boat, 3 Years Warranty, Blue
- CLEAN WIRING & CONTROL: POWER 12V ACCESSORIES WITH A SINGLE PANEL!
- AUTOMATIC DIMMING ENHANCES SAFETY DURING DAY AND NIGHT DRIVES.
- EASY INSTALLATION WITH ORGANIZED WIRES; FITS ANY VEHICLE TYPE!


Auxbeam 6 Gang Switch Panel BC60 Universal Circuit Control Relay System Automatic Dimmable LED Switch Pod Touch Control Panel Switch Box for Car Truck Pickup Boat UTV SUV - Blue, 3 Years Warranty
- AUTOMATIC DIMMING: ENHANCES SAFETY AND NIGHT DRIVING EXPERIENCE.
- EASY INSTALLATION: PLUG & PLAY DESIGN WITH NO COMPLICATED WIRING NEEDED.
- UNIVERSAL FIT: COMPACT SIZE FITS ALL VEHICLES, MAXIMIZING INSTALLATION OPTIONS.
Auxbeam 8 Gang Switch Panel BA80 Automatic Dimmable LED Touch Control Panel Box Electronic Relay System Car Touch Switch Box Universal for Truck ATV UTV Boat Marine SUV Caravan -Blue, 3 Years Warranty
-
AUTOMATIC DIMMABLE BACKLIGHT: ENHANCES VISIBILITY FOR SAFER DRIVING.
-
ROBUST SAFETY FEATURES: BUILT-IN RELAYS PROTECT FROM OVER-VOLTAGE AND MORE.
-
SIMPLE PLUG & PLAY INSTALL: EASY SETUP WITH CUSTOMIZABLE LABELS INCLUDED.

Thrustmaster Viper Panel: Backlit Control Panel, For Use with Viper TQS or Standalone, 43 Metal Action Buttons, Jettison, Trim, Landing Gear, Licensed by the U.S. Air Force (Compatible with PC)
-
IMMERSIVE VIPER CONTROL PANEL WITH ADJUSTABLE BACKLIT INDICATORS.
-
OFFICIAL U.S. AIR FORCE DESIGN ENSURES TOP-NOTCH REALISM & ERGONOMICS.
-
43 ACTION BUTTONS AND METAL CONTROLS FOR UNMATCHED GAMING PRECISION.

DaierTek 8 Gang Switch Panel RGB LED Lighted Multi-Function Switch Pod Toggle Momentary Pulsed Touch Control Switch Panel Dimmable for Car ATV UTV Boat Marine
-
SAFE POWER DISTRIBUTION: 60A BREAKER, NO OVERHEATING, NO NOISE.
-
SMART CIRCUIT PROTECTION: INDIVIDUAL FUSES & OVERLOAD SAFEGUARDS FOR SAFETY.
-
CUSTOMIZABLE CONTROLS: 4 OUTPUT MODES & 80 ICONS FOR EASY IDENTIFICATION.

Nilight 6 Gang Switch Panel Universal Circuit Control Relay System with Fuse Wiring Harness Automatic Dimmable ON-Off LED Switch Pod for Cars Trucks Boats ATV UTV SUV, 2 Years Warranty
-
CONTROL 6 DEVICES WITH RELAY & MEMORY SETTINGS FOR CONVENIENCE.
-
UNIVERSALLY FITS IN ANY VEHICLE FOR VERSATILE APPLICATION OPTIONS.
-
EASY PLUG-N-PLAY INSTALLATION SAVES TIME AND HASSLE FOR USERS.
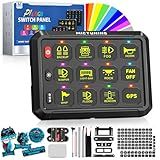
MICTUNING P1s RGB 5 Inch 12 Gang Switch Panel, High Power 6 Level Brightness Multifunction Toggle Switch Momentary Circuit Control Relay System Box for Truck RV Offroad Marine, w/Silicone Cover
- CONVENIENT 3 SILICONE BUTTONS: ENHANCE USABILITY WITH MEMORY FEATURES.
- VERSATILE WIRING OPTIONS: CHOOSE BETWEEN ACC OR BATTERY CONNECTIONS EASILY.
- 11 RGB MODES & 6 BRIGHTNESS LEVELS: CUSTOMIZE COLORS FOR ANY MOOD OR SETTING!

Logitech G Farm Sim Vehicle Side Panel for Farm Simulation 2025
-
SIMPLIFY COMPLEX MACHINERY WITH 6-AXIS SIDE PANEL LOADER STICK!
-
CONTROL YOUR ENTIRE FARM EFFORTLESSLY WITH 37 PROGRAMMABLE BUTTONS!
-
SECURE CLAMP DESIGN KEEPS YOUR CONTROLLER STABLE DURING USE!

HORI Truck Control System for Windows 11/10 with Force Feedback Steering Wheel, Shifter Control Panel, & Pedals
- IMMERSIVE 1800° WHEEL WITH DUAL MOTOR FEEDBACK FOR ULTIMATE REALISM.
- MULTI-FUNCTIONAL SHIFTER WITH 34 BUTTONS AND CUSTOMIZABLE RESISTANCE.
- DURABLE THREE-PEDAL SETUP WITH HALL EFFECT SENSORS FOR PRECISION CONTROL.
To install Plesk on cloud hosting, follow these steps:
- First, ensure that you have a cloud hosting account. You can sign up for a suitable cloud hosting service provider such as Amazon Web Services (AWS) or Google Cloud Platform (GCP).
- Once you have your cloud hosting account, log in to the cloud hosting control panel or dashboard.
- Next, navigate to the marketplace or application section within the control panel. Look for the option to install Plesk. Different cloud hosting providers may have different interfaces, so the exact location may vary.
- Select Plesk from the available applications or search for it if necessary. Click on the "Install" or "Deploy" button to initiate the installation process.
- In most cases, you will need to specify certain parameters during the installation, such as the version of Plesk, the server size, and the operating system. Make the appropriate selections based on your requirements.
- Once you have provided the necessary parameters, the installation process will begin. Depending on the cloud hosting provider and your server specifications, the installation can take some time to complete.
- After the installation finishes, you will receive confirmation of a successful installation. At this point, you should have Plesk installed and ready to use on your cloud hosting account.
- Access Plesk by entering the IP address or domain name associated with your cloud hosting account into a web browser. You should see the Plesk login screen.
- Enter the initial login credentials provided during the installation process to access the Plesk control panel.
- Once logged in, you can proceed with configuring and managing your websites, domains, email accounts, databases, and other aspects of your hosting environment using the Plesk interface.
Congratulations! You have successfully installed Plesk on your cloud hosting account and are ready to start managing your websites and other hosting resources.
How to manage multiple domains using Plesk on cloud hosting?
To manage multiple domains using Plesk on cloud hosting, you can follow these steps:
- Access your Plesk control panel by logging into your hosting provider's dashboard.
- Once logged in, navigate to the "Domains" section in Plesk.
- Click on the "Add Domain" button to add a new domain.
- Enter the domain name in the "Domain name" field and set up other configuration options such as hosting type, PHP settings, and web accessibility.
- Click on the "OK" button to add the domain.
- Repeat steps 3-5 for each additional domain that you want to add.
- To manage the settings of each domain, click on the domain name in the "Domains" section. Here, you can configure various settings such as DNS, SSL certificates, email accounts, and FTP access.
- After making any changes to the domain settings, click on the "Finish" or "Apply" button to save the changes.
- To upload files for each domain, go to the "File Manager" section in Plesk and navigate to the domain's root folder. You can upload files directly or create directories as needed.
- If you want to configure custom settings for a specific domain, such as PHP version, database settings, or additional security measures, you can do so by accessing the "Hosting Settings" or "Web Server Settings" options for that domain.
By following these steps, you can manage multiple domains efficiently using Plesk on cloud hosting. Remember to properly set up DNS records for each domain to ensure they are correctly pointed to your cloud hosting server.
What is Plesk?
Plesk is a web hosting control panel software that allows users to manage their websites, domains, e-mail accounts, and other aspects of their hosting environment in a user-friendly interface. It provides a graphical interface for easy management of server settings, file management, database administration, and other hosting-related tasks. Plesk supports various operating systems and is used by hosting providers, website owners, and web professionals to manage and administer their hosting environment efficiently.
How to install and manage the Git extension in Plesk on cloud hosting?
To install and manage the Git extension in Plesk on cloud hosting, you can follow these steps:
- Log in to your Plesk control panel.
- Go to "Extensions" in the left sidebar.
- Click on "Extensions Catalog" and search for "Git" in the search box.
- Click on the "Git" extension and then click on the "Install" button.
- Once the installation is complete, go back to the "Extensions" page.
- You should now see the "Git" extension listed. Click on it to open the extension.
- In the Git extension, click on the "+" button to add a new repository.
- Enter the repository name and the URL of your Git repository. You can also provide the credentials if required.
- Click on the "Fetch" button to retrieve the branches and tags from the repository.
- Once the fetch is complete, you will see the branches and tags listed in the extension.
- You can now manage your Git repository through the Git extension in Plesk. You can perform actions like cloning, pulling, pushing, merging, and checking out branches.
Note: The steps may vary slightly depending on the version of Plesk and the hosting provider you are using. It is recommended to refer to the documentation or support resources provided by your hosting provider for specific instructions.
How to manage DNS records for individual domains in Plesk on cloud hosting?
To manage DNS records for individual domains in Plesk on cloud hosting, follow these steps:
- Log in to your Plesk control panel.
- Navigate to the "Domains" tab on the left sidebar and select the domain you want to manage.
- Click on the "DNS Settings" option under the domain name.
- Here, you can add, edit, or delete DNS records for the selected domain. To add a new record, click the "Add Record" button, select the record type (e.g., A, CNAME, MX), and provide the necessary information such as the hostname and destination IP address. To edit an existing record, click on the pencil icon next to the record and modify the required fields. To delete a record, click on the trash bin icon next to it.
- Save your changes after making any modifications to the DNS records.
- It may take some time for the changes to propagate across the internet, so be patient.
Note: It is crucial to have a good understanding of DNS records and their functions before making any changes. Incorrect modifications can result in website and email issues.